Author Archives: jens_restemeier

Unity3D component setup from a Blender scene

It is sometimes convenient to specify the component setup of a model in Blender instead of Unity3D, to hide implementation details and to make the life of artists and designers easier. This is for example useful to specify invisible hits, or areas that can’t be navigated by AI. The easiest way to do that is to use custom properties in Blender.

Custom Properties

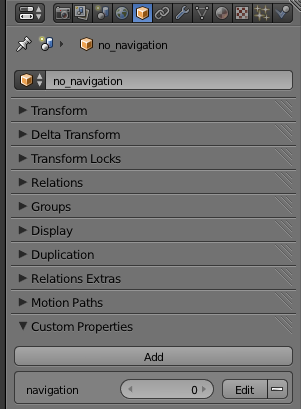
Blender allows to add custom string, float or integer properties to an object. The custom properties that are attached to meshes, materials or textures are stored separately, and are currently not picked up by Unity3D.

The new binary FBX exporter (from Blender version 2.71+) can write these values to a FBX file, which Unity3D can pick up during import. The automatic Blender importer in Unity3D still uses the old Ascii exporter, so you need to either export files manually, or modify the Unity3D import script to select the new exporter. I think it is a good idea to get the latest FBX exporter scripts from the nightly build, to get many fixes over the version released in 2.71.

Bildschirmfoto 2014-10-05 um 20.10.01

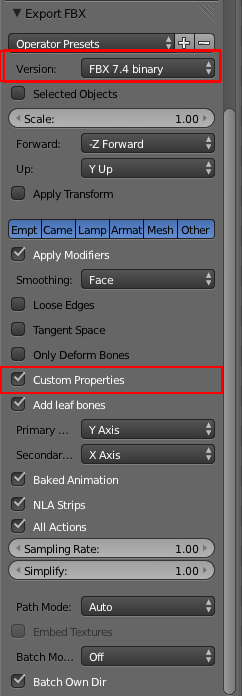
The new binary exporter needs to be selected, and “custom properties” needs to be enabled. I modified my Blender and Unity3D scripts to always use the new exporter and have “custom properties” enabled when models are imported.

On the Unity3D side they are received with AssetPostprocessor.OnPostprocessGameObjectWithUserProperties. It is a good idea to start with the example script to see if the custom properties are coming across.

Example setup

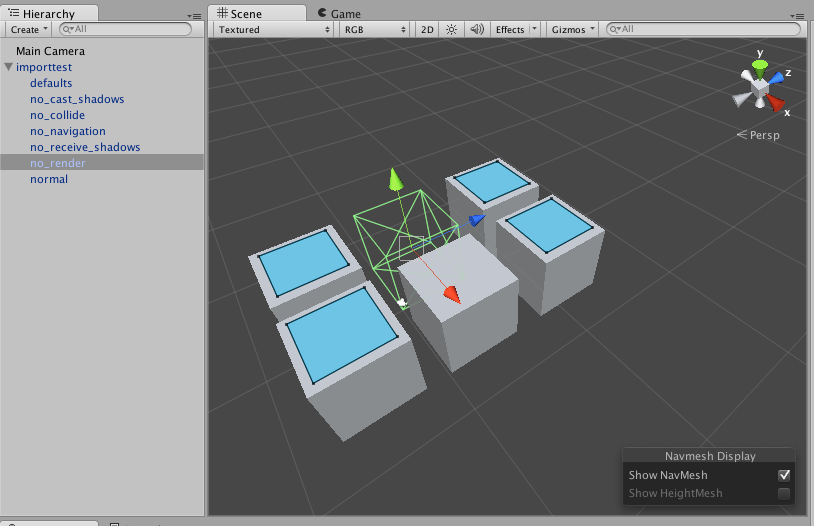
I am using several custom properties currently:

It is of course possible to add more game specific components to a GameObject. It seems to be safe to delete components, though deleting GameObjects causes an error. I just mark those objects as EditorOnly.

My AssetPostprocessor script is probably a bit overkill, because it supports setting file-global defaults in an Empty called “defaults” in Blender. If you hardwire the defaults you may be able to just process the properties once in OnPostprocessGameObjectWithUserProperties. That function is called once for each Blender node that has custom properties. To process all GameObject nodes you need to handle OnPostprocessModel as well.

using UnityEngine;
using UnityEditor;
using System.Collections.Generic;

// automatically configure game objects imported from a model
public class SetupGameObject : AssetPostprocessor {
	Dictionary<string, object> defaults = new Dictionary<string, object> ();
	Dictionary<GameObject, Dictionary<string, object>> settings = new Dictionary<GameObject, Dictionary<string, object>>();
	
	private bool GetProperty(GameObject go, string key, bool defaultValue) {
		Dictionary<string, object> objectSettings = null;
		if (settings.TryGetValue (go, out objectSettings)) {
			object o = null;
			if (objectSettings.TryGetValue(key, out o)) {
				return (int)o != 0;
			}
		}
		
		object os = null;
		if (defaults.TryGetValue (key, out os)) {
			return (int)os != 0;
		}
		
		return defaultValue;
	}
	
	private void ApplySettings(GameObject go) {
		bool castShadows = GetProperty (go, "castshadows", true);
		bool receiveShadows = GetProperty(go, "receiveshadows", true);
		bool generateCollider = GetProperty(go, "collision", true);
		bool isStatic = GetProperty(go, "static", false);
		bool renderMesh = GetProperty (go, "render", true);
		bool navigation = GetProperty (go, "navigation", true);

		if (isStatic) {
			GameObjectUtility.SetStaticEditorFlags (go, StaticEditorFlags.LightmapStatic | StaticEditorFlags.OccluderStatic | StaticEditorFlags.OccludeeStatic | StaticEditorFlags.BatchingStatic | StaticEditorFlags.NavigationStatic | StaticEditorFlags.OffMeshLinkGeneration);
		} else {
			GameObjectUtility.SetStaticEditorFlags (go, 0);
		}

		if (navigation) {
			GameObjectUtility.SetStaticEditorFlags (go, GameObjectUtility.GetStaticEditorFlags (go) | StaticEditorFlags.NavigationStatic);
		} else {
			GameObjectUtility.SetStaticEditorFlags (go, GameObjectUtility.GetStaticEditorFlags (go) & ~StaticEditorFlags.NavigationStatic);
		}

		MeshRenderer meshRenderer = go.GetComponent<MeshRenderer>();
		MeshFilter meshFilter = go.GetComponent<MeshFilter> ();
		SkinnedMeshRenderer skinnedMeshRenderer = go.GetComponent<SkinnedMeshRenderer> ();
		if (renderMesh) {
			if (meshRenderer) {
				meshRenderer.castShadows = castShadows;
				meshRenderer.receiveShadows = receiveShadows;
			}
			if (skinnedMeshRenderer) {
				skinnedMeshRenderer.castShadows = castShadows;
				skinnedMeshRenderer.receiveShadows = receiveShadows;
			}
		} else {
			if (meshRenderer) {
				Object.DestroyImmediate(meshRenderer);
			}
			if (meshFilter) {
				Object.DestroyImmediate(meshFilter);
			}
			if (skinnedMeshRenderer) {
				Object.DestroyImmediate(skinnedMeshRenderer);
			}
		}

		MeshCollider meshCollider = go.GetComponent<MeshCollider>();
		if (!generateCollider) {
			if(meshCollider) {
				Object.DestroyImmediate(meshCollider);
			}
		}
	}
	
	private void ApplyToChildren (GameObject go) {
		// apply settings to all gameobjects
		ApplySettings(go);
		foreach (Transform t in go.transform) {
			ApplyToChildren (t.gameObject);
		}
	}
	
	// this is called once by Unit3D after OnPostprocessGameObjectWithUserProperties
	void OnPostprocessModel (GameObject go) {
		ApplyToChildren (go);
	}
	
	// this is only called by Unity3D for game objects with properties
	void OnPostprocessGameObjectWithUserProperties(GameObject go, string[] properties, object[] values) {
		bool isDefault = go.name.ToLower () == "defaults";
		if (isDefault) {
			// I can't seem to delete this without errors, so let's just mark it "Editor only"
			go.tag = "EditorOnly";
		}
		Dictionary<string, object> newDict = new Dictionary<string, object> ();
		for (int i=0; i<properties.Length; i++) {
			string prop = properties[i].ToLower();
			object val = values[i];
			if (isDefault) {
				defaults[prop] = val;
			}
			newDict[prop] = val;
		}
		settings [go] = newDict;
	}
	
}

Blender 2.71 is out, and there are good news and bad news…

Blender 2.71 is out and available for download. The good news is that my patch to fix the problems with the space transforms was accepted and is included in the new binary FBX exporter. The bad new is that a later change broke it, so that only the root node has the space transform baked in. For simple meshes that are attached to the root node that may be fine, but on models with a more complicated hierarchy this means that the problem has now moved to the first child node of the model root.

I submitted a patch to fix this but it probably missed the deadline for the 2.71 release. I’ll try to get it accepted into Blender 2.72, but I’ll probably have to provide another option to support people who rely on the 2.71 behaviour.

At the moment Blender crashes when called from Unity3D but I haven’t worked out if the problem lies in a change in Blender or Unity. Running the Unity export script from the command line works fine, so it may be some problem with the way Unity launches Blender. The automatic pipeline still uses the Ascii exporter, so it doesn’t benefit from the fix anyway.

Update: It looks like the crash in Unity3D is related to a Python/MSVC problem. I attached WinDbg and was just about to open a bug, but it is already being looked at:
https://developer.blender.org/T40907
Updating the DLL fixes the crash for me.

Construct 2 as Level Editor

Construct 2 is actually a complete game engine that I often mention to artists or designers who want to experiment with their own projects. The free version has plenty of features and the pro and commercial versions are affordable, too. It uses an XML project format so importing a Pingus level is quite straightforward:

Pingus in Construct 2

Pingus in Construct 2

Editing and scrolling are very fast and I like the controls for placing and moving objects. When I wrote the importer it was mildly irritating that many of the XML tags have a dash in them, which breaks word selection when copy and pasting tags into sourcecode.

Construct 2 manages sprite and animation bitmaps itself, which may add a bit of extra work if you want to manage your own sprite sheets for editing. You can add your own properties to an object type.

It would be useful if you could group layouts or object types into folders, because the flat lists get a bit awkward to browse in a huge project.

(Comments disabled because of spam. Come on, guys! Is that really necessary?)

Importing Animation Events from Blender into Unity3D

A question that comes up often in Unity3D support forums is how to import animation events from an application. There is no built in way to do this, but it is possible create a custom system by adding an exporter and importer for animation events yourself, in this example for Blender.

Download

This is an example implementation for Blender. To start it should be imported into an empty project because it is likely that each team wants to customise the scripts to suit its workflow.

http://www.restemeier.com/blog/AnimationTest-1.1.zip ~265kB, MIT license
This is a new version with support for Mecanim.

Older versions:
http://www.restemeier.com/blog/AnimationTest-1.0.zip ~180kB, MIT license

Installation into Blender

Open “File/User Preferences…” and the “Addons” panel.

Addon Preferences screen

Addon Preferences screen

  1. Select “Install from file…” and open “Assets\Blender\io_anim_events.zip” from the project you installed the package into
  2. If you can’t easily see the new addon enable the “Import Export” category
  3. Enable “Export Animation Events”
  4. Save your settings

The File/Export menu should now have an “Anim Events (.xml)” entry. The default import script looks for events with the name modelname.events.xml, but you can adjust the import script to use a different naming convention if that suits your workflow better.

Set up in Blender

Blender supports both Timeline Markers, which are part of the scene, and Pose Markers, which are part of an action. The import script only looks for pose markers, but the timeline markers are exported as well. I assume you set up your Blender scene to have one action for each animation, so that they are imported as separate animations into Unity3D.

Blender Markers

Blender Markers

By default markers in Blender are created on the timeline, but when “Show Pose Markers” is enabled in the action editor markers are created as part of the action. Pose markers show up as tiny diamonds in the dope sheet, while timeline markers are displayed as tiny triangles. The marker name needs to be appropriate for the animation event you want to trigger. In my example implementation I just write them out in a similar format as they are displayed in Unity’s animation editor, but it is possible to just reserve a few keywords that the importer then processes into animation events.

The example exporter writes to an XML file, but it is equally possible to use csv or plain text files.

<?xml version="1.0" ?>
<scene fps="24" version="1">
	<timeline>
		<markers>
			<marker frame="77" name="TimeLineMarker"/>
		</markers>
	</timeline>
	<actions>
		<action name="Alpha">
			<markers>
				<marker frame="5" name="Banana(1)"/>
				<marker frame="20" name="Raspberry(&quot;Pi&quot;)"/>
				<marker frame="10" name="Pear(1.0)"/>
			</markers>
		</action>
		<action name="Beta">
			<markers>
				<marker frame="0" name="Apple()"/>
			</markers>
		</action>
		<action name="CubeAction">
			<markers/>
		</action>
		<action name="Gamma">
			<markers/>
		</action>
	</actions>
</scene>

Import into Unity3D

I implemented three different import methods in Blender that are available from a preference pane.

Event Import Preferences

Event Import Preferences

  • Import XML looks for modelname.events.xml and applies the events in that file to the animations of a model during import.
  • Import Asset looks for modelname.events.asset . This can be used if you don’t want to specify animation events in Blender. To get an empty asset you need to select the model in the project view and select “Window/Add Event Data”. For production use it would be worth wrapping the class with a custom editor.
  • Import Automatic runs Blender in the background, exports animation events into the temporary directory and imports them right away into the model. This only works with .blend files. To make this work you need to specify the path to the Blender executable.

This is implemented by adding an AssetPostprocessor with OnPostprocessModel handler that is called whenever a model is imported in Unity. At the point when the handler is called the model and animation data is still writable, so it loads the event descriptions from a second file (modelname.events.xml or modelname.events.asset) and adds them to the appropriate animations.

I would use the automatic import if models are kept as .blend file in the project, the XML import if models are manually exported into .FBX files, and the asset importer if the animation tool doesn’t support events.

Example event handler

Animation events need to be received by a behaviour. This example behaviour is added automatically by the asset postprocessor, so each team will most likely want to customise it for their projects.

public class EventReceiver : MonoBehaviour {
	public void Apple() {
		Debug.Log ("Apple()");
	}
	public void Banana(int i) {
		Debug.Log (String.Format ("Banana({0})", i));
	}
	public void Pear(float f) {
		Debug.Log (String.Format ("Pear({0})", f));
	}
	public void Raspberry(string s) {
		Debug.Log (String.Format ("Raspberry({0})", s));
	}
}

Other options for automatic export

Running Blender from the asset postprocessor is the least invasive method, but requires Blender to be run twice, once for exporting the FBX and once for the animation events. An alternative is to run the animation event exporter whenever an FBX is exported, either from the Blender side or the Unity side.

The Blender script to export FBX lives at “Program Files\Blender Foundation\Blender\version\scripts\addons\io_scene_fbx\export_fbx.py” and the Unity3D script to run Blender is at “Program Files\Unity\Editor\Data\Tools\Unity-BlenderToFBX.py”. Though customising these scripts may mean more work across a big team or when updating Unity or Blender.

Another option is to keep Blender running in the background and sending commands to it, similar to how the Max and Maya pipelines work in Unity3D.

Mecanim

Mecanim has an interface to add events during import so I modified my scripts to add new events to events specified this way. Unfortunately there doesn’t seem to be an official API to get the imported animation clips when using mecanim. I’m using Object.FindObjectsOfType (typeof(AnimationClip)) which picks up some other animation clip objects as well, and there doesn’t seem to be a way to identify which belong to the import. At the moment I rely on clip names not having any conflicts. Please let me know if you run into problems.

Package Contents

Assets\Blender\io_anim_events.zip Blender exporter addon installation file
Assets\Blender\io_anim_events\export_events.py Script to write animation markers into a xml file
Assets\Blender\io_anim_events\__init__.py Script to register the exporter into the Blender UI
Assets\Models\cuberot.blend Simple model with animation and markers
Assets\Models\cuberot.events.asset Manually edited marker using a ScriptableObject
Assets\Models\cuberot.events.xml XML file exported from Blender containing events
Assets\Models\Materials\Material.mat Diffuse material for test object
Assets\Scenes\TestModel.unity Example Scene. Running this should display log messages to the console whenever an animation event is triggered
Assets\Scripts\EventReceiver.cs Example implementation of a MonoBehaviour that receives animation events. It will be added automatically to an imported model.
Assets\Scripts\Editor\EventData.cs Example ScriptableObject to specify animation events outside of Blender
Assets\Scripts\Editor\EventImporter.cs AssetPostprocessor implementation that applies animation events to a model after it was imported
Assets\Scripts\Editor\EventImporterPreferences.cs Preference panel to select import method and specify Blender path
Assets\Scripts\Editor\XMLEvents.cs Class to load XML events. This uses the C# XmlSerializer class

GLEED2D as Level Editor

GLEED2D is written in C# and XNA. It uses an XML file format so it was easy to import a Pingus level:

Pingus in GLEED2D

Pingus in GLEED2D

The editor rounds up texture sizes to the next power of two, and scale factors and the rotation origin are relative to this scaled up size. That makes importing and exporting levels slightly more complicated. In most cases I would pack background sprites into an atlas before rendering, so I can’t think of many reasons for expanding individual sprites to power of two.

Level drawing and editing is very fast, and the image browser makes it very fast to add new sprites to a level. You can specify custom properties, but they are attached to a sprite instance and not a sprite definition. It is possible to specify programs to run after a level is saved or to preview a level in a game.

Documentation seems to be only available as videos, which I find more time consuming than reading documentation, especially when I need to look up specific features.

The image browser caused an exception when displaying a large sprite directory. I’m not sure if it ran into a windows resource limit or just failed to load a file, but I think for a proper project you would organise sprites into smaller subdirectories anyway.

OGMO as Level Editor

OGMO is another editor written in C#. The main focus is tile based editing, but it supports a free form entity layer. This is a Pingus level imported into OGMO:

Pingus in OGMO

Pingus in OGMO

Editing and scrolling a level becomes very slow, even in small levels. To be fair, though, the entity layer is good enough for placing enemies and traps. Changes to the project definition require levels to be closed and reloaded. It is possible to attach custom data to levels and sprites.

OGMO writes project and level data in XML format that is easy to read and write. One thing to watch out for is that the file format uses localised floating point format, so an international team with mixed locales may run into problems when exchanging levels. The rotation origin seems to be the unscaled origin, and scale is the top left corner.

There doesn’t seem to be any written documentation and at the moment the website only contains a few tutorial videos, so a lot of the user interface needs to be explored by trial and error.

Importing Layered Textures from Blender into Unity3D

dwarf_layers

Dwarf in Unity

This is a first experiment to import layered textures from Blender into Unity3D. This still uses the default Unity3D lighting function, but combines the texture layers that are on the Blender shader. The left dwarf is imported with the default exporter, the middle dwarf uses the improved exporter I am working on, and the right dwarf uses an improved material importer.

dwarf_render

Dwarf in Blender

To compare, this is the dwarf rendered in Blender.

Spriter as Level Editor

Spriter is an animation package for sprites, so trying to edit levels with it is probably not fair. I quite like a lot about its user interface and general performance, so I imported a Pingus level into it:

Pingus in Spriter

Pingus in Spriter

There is no way to add custom attributes (at least in the version I tried), and no way to specify groups or layers. It seems to stall whenever it needs to go through sprite data, for example after zooming or scrolling, or after changing the selection. This is most likely caused by the number of sprites, and with a more appropriate scene size for animation it shouldn’t be a problem.

I do quite like the user interface, and I imagine a more organic looking level with many animated elements would look very good. For now it may be a better idea to just animate parts of a level in Spriter and use a different editor to build the complete level.

DAME as Level Editor

DAME is a level editor developed on the Adobe Air platform. Air gives it cross-platform compatibility but seems to require quite a lot of CPU performance. Many of DAME’s features are for editing tile based or isometric maps but it is possible to edit free form layouts as well. This is a Pingus level in DAME using sprite layers:

Pingus level in DAME

Pingus level in DAME

Zooming out is disabled by default and enabling it can break map rendering. Air renders everything through the Flash player which seems to eat up quite a bit of rendering performance. It uses custom UI widgets which look and feel slightly different to the platform default widgets.

DAME uses an XML based file format that is easy to read and write, you can attach custom properties to sprites, and you can set a scroll factor on each layer to preview parallax effects. Sprites can be animated and can have per-frame collision data. It is possible to group the sprite information into folders to make it easier to find specific sprites. DAME uses Lua to implement custom level exporters.

R.U.B.E as Level Editor

R.U.B.E is an editor designed to edit scenes for the Box2D physics engine, but it is flexible enough for general level editing. So this is a Pingus level in R.U.B.E:

pingus-rube

Pingus in R.U.B.E

R.U.B.E is very fast, but feels very low level. I don’t like that editing different elements requires mode switches and that some functionality is only bound to keyboard shortcuts, but that probably makes it very fast to use once you’ve learned them. Some of the editing keys feel familiar from Blender, so a Blender user may be at an advantage. R.U.B.E embeds AngelScript as a scripting language to extend and customise the editor.

It would be useful to be able to organise a scene into different layers. Similar to Inkscape I am missing some kind of library to store reusable gameplay elements, but this could probably be implemented using the scripting language.

The file format is designed around the Box2D runtime, but with a bit of work it is possible to use it in a different engine. It is a JSON document that can be easily accessed from many programming languages.

Update: For some reason the spambots like this post, so I disabled comment posting. Sorry about that!